 Spring Sale!
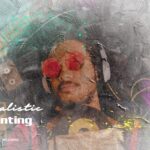


Using Smart Objects in Photoshop
Introduction:
In this tutorial, you will learn how to use Smart Objects in Photoshop to create a stylish article-like effect for your images. By the end of this tutorial, you’ll be able to seamlessly integrate images into a magazine-style layout, adding a professional touch to your design.
Step 1: Prepare Your Workspace
1. Open Adobe Photoshop and create a new document with the desired dimensions for your article layout.
2. Import the background image you want to use for your article. This could be a textured paper or any other suitable background.
Step 2: Import and Convert Your Image into a Smart Object
1. Open the image you want to integrate into the article-style layout.
2. Select the entire image by pressing Ctrl/Cmd + A and copy it by pressing Ctrl/Cmd + C.
3. Go back to your main document and paste the copied image as a Smart Object by selecting “Edit” > “Paste Special” > “Paste as Smart Object” or by right-clicking and choosing “Paste as Smart Object.”
Step 3: Arrange and Scale the Smart Object
1. Select the Smart Object layer in your Layers panel.
2. Use the Free Transform tool (Ctrl/Cmd + T) to adjust the size, rotation, and placement of the Smart Object to fit within your article layout. Hold Shift while resizing to maintain the aspect ratio.
Step 4: Apply Filters and Effects
1. With the Smart Object layer selected, go to “Filter” > “Filter Gallery” to apply artistic filters such as Cutout, Dry Brush, or Watercolor to give your image an artistic look that matches the article style.
2. Experiment with different filter settings until you achieve the desired effect. Click “OK” when you’re satisfied.
Step 5: Add Text and Graphic Elements
1. Use the Text tool (T) to add article title, subtitle, and body text to your layout. Choose fonts and sizes that complement the overall style.
2. Insert any additional graphic elements or design elements that enhance the article layout, such as dividers, drop caps, or decorative shapes.
Step 6: Fine-Tune the Smart Object
1. Double-click the Smart Object thumbnail in the Layers panel to open the original image in a new tab.
2. Make any necessary adjustments to the image, such as brightness, contrast, or color balance.
3. Save the changes and close the tab. The Smart Object in your main document will update automatically.
Step 7: Final Touches and Export
1. Review your article-style layout and make any final adjustments to text, colors, or positioning.
2. Once you’re satisfied, save your Photoshop file.
3. To export your final design, go to “File” > “Export” > “Export As” and choose the desired format (e.g., JPEG or PNG). Adjust the quality settings if needed and click “Export.”
Conclusion:
Using Smart Objects in Photoshop allows you to create a sophisticated article-style effect by seamlessly integrating images into your design while maintaining the flexibility to make edits and adjustments. With the steps outlined in this tutorial, you can elevate your design skills and produce stunning visuals for your projects.
Greetings! Very helpful advice in this particular article! It is the little changes that will make the largest changes. Many thanks for sharing!